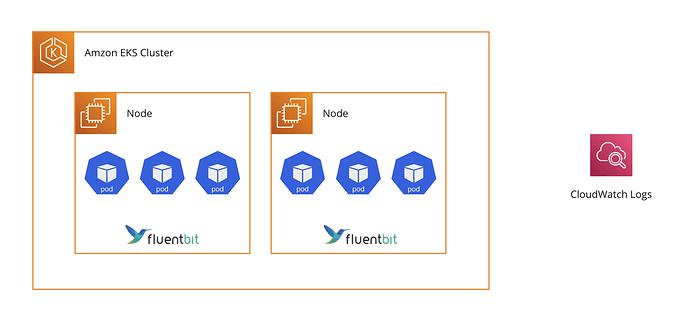
มา set up Fluent Bit DaemonSet บน Amazon EKS cluster ให้รวบรวมและส่ง logs จาก containers ไปที่ CloudWatch Logs แบบไว ๆ กันครับ
Prerequisites
 Let’s start!
1. Create a namespace
สร้าง namespace ชื่อ amazon-cloudwatch (ชื่อนี้เท่านั้น เพื่อให้สอดคล้องกับ Fluent Bit template ในข้อ 4.)
export NAMESPACE=amazon-cloudwatch
kubectl create ns $NAMESPACE
2. Configure an IAM role for a service account (IRSA)
สร้าง IAM role for a service account (IRSA) เพื่อให้ CloudWatchAgentServerPolicy permission กับ Fluent Bit (อย่าลืมเปลี่ยน <YOUR_CLUSTER> เป็นชื่อ cluster ของเรา)
export CLUSTER=<YOUR_CLUSTER>
export CLOUDWATCH_AGENT_SERVER_POLICY_ARN=$(aws iam list-policies --query 'Policies[?PolicyName==`CloudWatchAgentServerPolicy`].Arn' --output text)
eksctl create iamserviceaccount \
    --name fluent-bit \
    --namespace $NAMESPACE \
    --cluster $CLUSTER \
    --attach-policy-arn $CLOUDWATCH_AGENT_SERVER_POLICY_ARN \
    --approve \
    --override-existing-serviceaccounts
ตรวจสอบรายละเอียดของ service account ต้องมี role-arn
kubectl -n $NAMESPACE describe sa fluent-bit
Output
Name:                fluent-bit
Namespace:           amazon-cloudwatch
Labels:              app.kubernetes.io/managed-by=eksctl
Annotations:         eks.amazonaws.com/role-arn: arn:aws:iam::<YOUR_ACCOUNT_ID>:role/eksctl-<YOUR_CLUSTER>-addon-iamserviceaccount-a-Role1-ABCDEFGHIJKLM
Image pull secrets:  <none>
Mountable secrets:   fluent-bit-token-abc12
Tokens:              fluent-bit-token-abc12
Events:              <none>
3. Create a ConfigMap
สร้าง ConfigMap ชื่อ fluent-bit-cluster-info เพื่อตั้งค่าการทำงานของ Fluent Bit (อย่าลืมเปลี่ยน <YOUR_REGION> เป็น region ของ cluster)
export REGION=<YOUR_REGION>
export FLUENT_BIT_HTTP_PORT='2020'
export FLUENT_BIT_READ_FROM_HEAD='Off'
[[ ${FLUENT_BIT_READ_FROM_HEAD} = 'On' ]] && FLUENT_BIT_READ_FROM_TAIL='Off'|| FLUENT_BIT_READ_FROM_TAIL='On'
[[ -z ${FLUENT_BIT_HTTP_PORT} ]] && FLUENT_BIT_HTTP_SERVER='Off' || FLUENT_BIT_HTTP_SERVER='On'
kubectl -n $NAMESPACE create configmap fluent-bit-cluster-info \
--from-literal=cluster.name=${CLUSTER} \
--from-literal=http.server=${FLUENT_BIT_HTTP_SERVER} \
--from-literal=http.port=${FLUENT_BIT_HTTP_PORT} \
--from-literal=read.head=${FLUENT_BIT_READ_FROM_HEAD} \
--from-literal=read.tail=${FLUENT_BIT_READ_FROM_TAIL} \
--from-literal=logs.region=${REGION}
4. Download and deploy the Fluent Bit daemonset
kubectl -n $NAMESPACE apply -f https://raw.githubusercontent.com/aws-samples/amazon-cloudwatch-container-insights/latest/k8s-deployment-manifest-templates/deployment-mode/daemonset/container-insights-monitoring/fluent-bit/fluent-bit.yaml
ตรวจสอบว่ามี pod ชื่อ fluent-bit-* เกิดขึ้น
kubectl -n $NAMESPACE get po
Output
NAME               READY   STATUS    RESTARTS   AGE
fluent-bit-a1b2c   1/1     Running   0          15s
5. Test
ตรวจสอบที่เมนู CloudWatch Log groups จะมี logs ของ cluster เพิ่มเข้ามา 3 groups ดังนี้
ซึ่งสามารถ search, filter, analyze logs ตามต้องการได้ที่เมนู Logs Insights
Clean up
# Fluent Bit stack
kubectl -n $NAMESPACE delete -f https://raw.githubusercontent.com/aws-samples/amazon-cloudwatch-container-insights/latest/k8s-deployment-manifest-templates/deployment-mode/daemonset/container-insights-monitoring/fluent-bit/fluent-bit.yaml

# IRSA
eksctl delete iamserviceaccount --name fluent-bit --namespace $NAMESPACE --cluster $CLUSTER --wait

# Namespace
kubectl delete ns $NAMESPACE
References:


